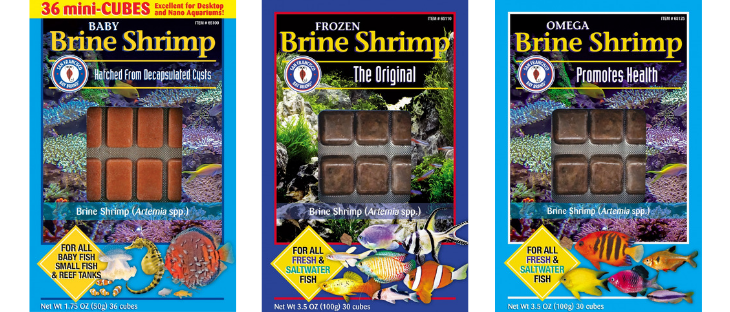
Last week, we received an email from a long-time customer asking what we thought about a brand of frozen baby brine shrimp she came across and how it’s different than our Frozen Jellyfish Food. So, we thought we’d write a blog post about it!
San Francisco Bay Brand makes great frozen food for fish! However, typical frozen brine shrimp is not the perfect meal for jellyfish. Here’s why:
The two foods on the right, “Frozen Brine Shrimp” and “Omega Brine Shrimp,” are adult brine shrimp—not baby. They will be way too big for jellies to ingest and can ultimately cause water quality issues since the jellies won’t be able to fully consume them. Adult brine shrimp are on average 8 mm in total body length, whereas baby brine shrimp (a.k.a. “nauplii”) are less than 0.4 mm — that’s 20x larger! Way too big for the moon jellies in your aquarium.
The food on the left, “Baby Brine Shrimp,” is the most optimal of the three since it’s actually BABY brine shrimp, but here’s why it shouldn’t be the only food you feed your jellies. It is straight baby brine shrimp. It’s not enriched, so there are no additional vitamins or nutrients that jellyfish need to be happy and healthy. They only have the nutritional value of 24 hour hatched nauplii, in which most of the nutrition comes from the egg sac. Moon jellyfish need more than the nauplii to grow and keep a strong, healthy bell shape. Therefore, we don’t recommend using this brand of frozen baby brine shrimp as a sole alternative to our Frozen Jellyfish Food, but it would be fine to use in a pinch!
How is our food different?
We use a specific enrichment formula that provides all of the necessary vitamins and nutrients for jellyfish. We’ve spent many years perfecting this formula and figuring out what jellies absolutely cannot live without in order to grow larger and stronger. We’re confident our Frozen Jellyfish Food is the best jellyfish food available today because it’s the same food we feed our generations of lab-raised jellyfish and it’s still used by many public zoos and aquariums across the country. It’s also one of the cleanest jellyfish foods. By “clean” we mean it does not turn your water cloudy or opaque when fed out. This is essential for jellyfish aquariums because since jellyfish are 96% water, you don’t want to feed anything that will foul your water quality.
Another key aspect to all jellyfish food is buoyancy. Jellyfish food should be neutrally buoyant, allowing it to stay in the water column as long as possible. Our Frozen Jellyfish Food is neutrally buoyant. This allows the jellyfish more time to grab the food and eat more of it before it either sinks to the bottom (negatively buoyant) or floats to the top and out the drain (positively buoyant).
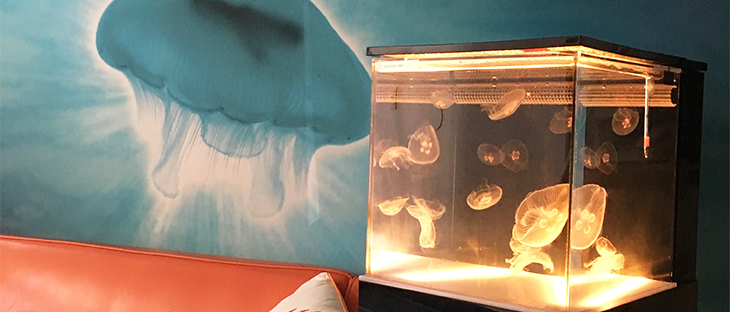
If you’ve got one of our beloved EON jellyfish tanks, then you’re probably familiar with the color-changing LED lights we outfitted for you. They help make your little jelly friends easier to see when they don’t have food in their stomachs, and they give you the opportunity to throw yourself a jellyfish disco party. However, like everything else, they can also cause problems when you use them too much.
Problem 1- Algae
If your tank has been set up for more than a week or two, you’ve probably noticed some green or brown algae starting to appear on the walls or floor of your tank. That’s perfectly normal—actually impossible to avoid—but it does need to be scrubbed off before it builds up too much. What’s the point of having pet jellyfish if you can’t even see them through all the algae, right? It can also have harmful effects on the water quality when it gets too thick.
Algae is photosynthetic, like plants, so it needs light to grow and the more light you give it, the more it will grow. You’ll probably notice one of the first places it starts to really build up is just over the light strips on the floor of your tank. So while you can’t stop it from showing up and growing, controlling the amount of time you keep your lights on will keep algae growth somewhat in check.
Problem 2- Your Jellies Themselves!
While jellyfish don’t have brains or eyes, they can perceive the difference between light and dark using small light-sensing organs called rhopalia, which are located around the perimeter of their bells.
As such, like many animals, some of their internal functions are based around daily light cycles. It is important to your jellies’ health that you replicate these light-dark cycles with your tank’s LEDs.
The Solution- A Simple Timer!
Rather than trying to force yourself to remember turn the lights off in your tank every night, you can just buy a timer and set it so your light will go on and off automatically. They’re cheap (many effective models are less than $10) and available online or at pretty much any hardware store. Just plug the timer into your electrical outlet, then plug the lights into your timer, and set it for your desired time.
We recommend 12 hours light, 12 hours dark, but it’s up to you which specific times of day you choose.
One question we commonly receive from aspiring jellyfish owners is something along the lines of, “Do I need a circular tank for jellies, or can I just keep them in my reef tank with my other saltwater critters?” There are a couple different elements to consider in that question, but the answer would ultimately be a no to both.
Though it seems that jellies can get along just fine with most saltwater aquarium species, the tanks themselves pose major problems. Reef tanks have numerous features that can seriously harm jellyfish: sand can scratch or get stuck in their bells, aerator bubbles can be trapped in their bells and cause them to float at the surface and prevent them from eating, and sharp corals can snag on jellies them and tear them to pieces. However, even without any treacherous decorations, a normal fish tank is no place to keep most jellies.
Jellyfish are categorized as plankton, which means they cannot swim against a current, and therefore they’ve adapted to simply drift wherever the sea takes them. Though that may sound like an appealing zen philosophy, it doesn’t translate well to life in the static environment of nano reef systems. Without a constant current in their tank, jellies sink to the bottom almost immediately, and nothing good happens from there.
The traditional tank style for jellyfish culturing is the plankton kreisel (above), which provides one source of current flow that is transferred across a circular space to keep planktonic species suspended in the middle. Though it has been the standard of aquaculture for decades, it doesn’t always make for the nicest of displays. That’s why we created the EON Jellyfish System!
Though the EON has a square shape, the flow pattern created by the dual spray bars is circular, and keeps your jellies suspended the same way a kreisel would, with the added bonus of a stylish display that can fit seamlessly into any interior decor scheme. The width of the spray bars is such that your jellies won’t get stuck in the corners, and the hidden valves make it possible to adjust the flow depending on the size and quantity of jellies you’re keeping. It also has a self-contained sump and a highly efficient multi-stage drip filtration system that make it much easier to maintain a healthy and stable aquatic environment without all the bulky external pieces that a kreisel requires.
So the moral of the story is: The tank doesn’t necessarily have to be circular, but to keep your jellies alive there must be a constant circular flow of water in their tank.
Relocating? Need some help figuring out how & when to move the jellyfish?
First, there’s a couple things to keep in mind.
Time is of the essence. As you know, your jellies need a constant current of water, so it’s not good to keep them out of their tank for more than a day. For the same reason, it’s crucial that your tank has access to electricity to keep the pump running, so you can’t leave it in your new place before the utilities are sorted out. This process needs to happen as quickly as possible to ensure the safety of your jellies, so it’s probably a good idea to save the jellyfish tank for the last day of your move.
Your filter media needs to remain submerged and in the dark the entire time. You spent a whole month cycling your tank’s bacteria, but it only takes a couple hours to kill them off again if you let your filter media dry out or expose it to sunlight for too long. Make sure you have something to accommodate your bio balls and carbon filters, for example a large, sealable ziploc bag or watertight tupperware container, and something to keep them shaded, like a drawstring bag or even just a towel to wrap them in.
Once you set the tank up, it’s hard to move. Make sure you already have the location picked out for your tank in the new house so you only have to set it up once. You may want to review this guide to choose the right place for your tank.
And here’s a list of the supplies you’ll need:
Buckets or tubs, one or two big enough to hold the water in your tank, plus another bucket for a few gallons of extra new saltwater
2-3 gallons of newly mixed/purchased saltwater to add to your system while you’re setting it back up
Large trash bags to line the bucket(s)
Zip ties to cinch the trash bags closed so the water doesn’t spill
Large ziploc bag or tupperware to store your bio filter media
Towels to keep you from ruining your new or old floors
Small cup for transferring jellies in and out of your tank
Level to make sure your tank is level in your new home
Alright, you’ve gathered your supplies, now you’re ready for the breakdown.
Photo by Pixabay on Pexels.com
Breakdown
Step 1: Prepare the jellyfish transition container. Line a bucket or plastic tub with a trash bag, and begin to fill the bag with a few gallons of water from your tank.
Step 2: Transfer your jellies out of the tank. Unplug your tank, and gently move the jellies from your tank to your bucket using a small cup.
Step 3: Take the filter media out of the tank. Take the bio balls and carbon filters (and micron pad if you have one) out of your filter box and place them in a large ziploc bag or tupperware container. Fill the container with tank water and seal it for transportation, then wrap it in a towel or put it in a drawstring bag to keep it out of the sunlight.
Step 4: Get the rest of the water out of your tank. Fill the jellyfish bucket the rest of the way up with water, then fill another bag-lined bucket with the remaining water until your tank is empty. Now cinch your bags closed with zip ties, making sure to get ALL the air out of the bags. This way they don’t slosh around or spill in your vehicle, and your jellies won’t be harmed by air bubbles.
Step 5: Dry the inside of your tank. Give the interior a good wipe down with a towel to make sure it won’t get the inside of your vehicle wet. You may want to leave a towel in the display area and a towel in the sump just to soak up any extra water on the drive.
Step 6: Pack it up. Keep the drip tray, soffet, and lid separate from the tank so they don’t rattle around and scratch the acrylic. You may want to wrap the tank in a moving blanket to prevent scratching or other damage.
Now you’re at the new place, so it’s time to set it all back up.
Step 1: Place your tank in its new spot. Make sure it’s level before you add water, but keep in mind it may shift with the added weight of the water. If it’s not level, wedge a shim underneath it in the right places until it is. Keeping your tank level is essential.
Step 2: Add water and filter media to the tank. Take the water out of your no-jelly bucket and put it back in the tank, then keep filling it as close to the top as you can while keeping at least a couple gallons of water in the jelly bucket. Add your filter media back to the filter box, preferably using a clean mechanical filter to catch any gunk that may come out of your spray bars when you turn the pump on. Now fill the remainder of the tank with the few gallons of new saltwater you brought, keeping an eye on the sump level so as not to cause an overflow.
Step 3: Turn the pump on and wait. Now your tank is ready to be up and running again, so plug the pump back in and let the water cycle through for at least an hour before you add your jellies back. There will probably be some loose gunk from the plumbing or the biological filters floating in the system, which you can simply allow the mechanical filters to catch over time, or remove yourself with a turkey baster.
Step 4: “Burp” the air out of your tubing. As you add water back, air bubbles will start to form in your tubing and in your spray bars, which can harm your jellies if they make their way into the display area of your tank later. Give your tubing a gentle shake to loosen some bubbles, then give it a gentle squeeze to help push the bubbles out. Now move your finger under the top spray bar and push the bubbles out from underneath, and repeat the process until they’re gone.
Step 4: Acclimate your jellies. Even though your tank has mostly the same water as before, the new salt water you added may create a slight change in water temperature and/or chemistry that could potentially harm your jellies if you just dump them straight in. So just to be safe, perform 3-4 small water changes [roughly a cup (8oz)] over the course of half an hour once the water in your tank starts to clear up. Then you can gently add them back to your tank one by one with the cup you used earlier.
Step 5: Welcome your jellies to their new home! Sharing cake and balloons with loved ones is encouraged, but not necessary.
Jellyfish tanks are a beautiful addition to any interior space, but like any work of three-dimensional art, it’s important to consider which part of the room can best accentuate its features. In the case of your tank, placement is also an issue of utility.
First off, your tank’s flow is powered by an electric pump, and the display is illuminated by LED light strips, each of which require their own power supply. So make sure you have a spot in mind with an empty power outlet or a power strip with at least two open plugs nearby.
The second thing to consider is the surface underneath your tank. The system will weigh roughly 85 lbs. once it’s full of water, so it needs to be kept on a table or counter that can bear that kind of load. It’s also critical that your surface is completely level; even a small degree of tilt could interfere with the function of your system and spray bars, which will create air bubbles in the tank that can hurt your jellies.
Last but not least is the position of your tank within the room. Though you might your little friends to have a nice view of the outside world, you should never place your tank anywhere near a window, especially if that window gets direct sunlight during the day. Sun exposure can cause your system’s temperature to fluctuate to dangerous extremes for your jellies, and it leads to unappealing amounts of algae buildup.
So, the quick recap:
Keep the tank on a sturdy, level table or countertop, make sure it’s not too close to any windows or in the path of direct sunlight, and have at least two open plugs nearby.
If you’re looking into getting new pets, it’s always important to consider how long they’ll be with you, especially if you’re going to make the effort to set up a specific living space for them.
In our many years of experience, we’ve found that in small home aquariums, your pet moon jellies will typically live for about one year after their strobilation, or their ‘birth’, from the polyps.
Now that doesn’t mean they will necessarily live a full year in your tank. The distinction here is that we aren’t sending you a set of one-day-old jellies. It takes around 2 months for us to raise them to the 1-inch ‘small’ size, so by the time they get to your tank, they’ll have another 10 months to go. If you get the 2-inch medium size, it’ll probably be closer to 9 months, and so on.
But that’s only an average!
If you keep your jellies happy and fed with a stable water system, healthy bacteria, and constant water chemistry, they could last even longer. It all comes down to how well you maintain your system. And since you’re reading this blog, you’re well on your way to being a true jellyfish master– the sky’s the limit!
There are various sources around the internet advising fellow jellykeepers that it’s okay to use their hands to remove jellyfish from their tanks… Please don’t do this. Use a ladle or small plastic cup.
Jellyfish must be completely submerged in water at all times. No matter what.
You shouldn’t do this for a couple of reasons:
When scooping jellyfish out of water with your hands, you can’t stop the water from escaping through your fingers. This leaves your jellyfish completely exposed to air. Exposing jellyfish to air will allow air bubbles to become trapped inside their mouths and stomachs. Yes, moon jellyfish are considered “hardier” than most jellyfish species, but air bubbles are trouble to all jellyfish. Yes, you can surely burp these bubbles out of them, but again, this causes more trouble to your jellyfish doing this over and over. If a bubble travels too far into a jellyfish’s stomach, it can cause them to float towards the top and will eventually make it’s way out even if it means breaking through the jelly’s bell.
You will also cause damage to their body shape immediately. Since jellyfish are 96% water and have no bones or internal structure, they rely on the water around them to support their body. Once they are taken out of water, their mesoglea (a.k.a. the “jelly” to jellyfish) becomes heavy water weight with gravity pulling their bodies down. This will cause small tears and rips internally to their nerves and tissue while also be detrimental to their bell shape.
Simple depiction of how the forces of water support a jellyfish’s body shape.
When moving jellyfish from out of your tank or from one body of water to another, please always use a ladle, cup, or bowl to keep your jellies submerged under water the entire time. Although their sting is not strong enough to penetrate through human skin, it’s simply not wise to use your hands as a transportation device and to take any marine animal out of the water.
There are a number of different sized ladles and cups available online today, so finding one to perfectly fit the opening of your tank or the size of your jellies should be easy!
TIP: We recommend the use of small 6-8 oz yogurt cups. We have a small collection that we use here in the lab and find them very helpful for small situations!
Watch our video below to see how you can move your jellies (while keeping them fully submerged) using a ladle or a small cup/bowl.
If you’re thinking about bringing home a new pet, the first question that probably comes to mind is
“What does it eat?”
Since most grocery stores don’t carry big bags of dry jellyfish food in the pet section, and pet store selections are usually limited to dry fish flakes and pellets, you might be scratching your head trying to figure out just what the heck a jellyfish might eat.
Well, put down that jar of peanut butter… You’re gonna need something a little less chewy — baby brine shrimp!
In the wild, most jellies eat all sorts of small planktonic larvae (free-floating baby sea critters), but baby brine shrimp are their all-time favorite dish. If you have the ability to cultivate your own live brine shrimp, that would be the best option. But for the casual jellyfish owner, there are simpler options available that will make your little jellyfriends very happy.
Pet jellyfish love to eat our specially enriched frozen brine shrimp we prepare each and every day. We’ve spent over 20 years perfecting our formula, and the jellies really seem to appreciate it! They only need a small amount of it (about ¼ inch of a stick per 3 small jellies) floating freely in the water with them, and they’ll swim around plucking it out of the water on their own.
This is a question we get all the time when folks see a jellyfish Tumbler Tank. It looks like a traditional square or rectangular aquarium, but it has some specific modifications inside it that make it safe for jellyfish.
Back in the 1960’s the plankton kreisel (German word meaning, “to spin”) was crafted to hold all sorts of planktonic animals because it was evident they could not survive in a normal aquarium. They needed a current inside the tank to assist them to swim or bell, otherwise they just laid on the bottom of the tank. A piece of acrylic was formed into a circle and placed inside a square aquarium. Then a small stream of water by way of spray bars was introduced along the interior of the circle. This created what is termed, laminar flow. The spray bars created a false current by spinning the water around the interior of the circle. Think of a whirlpool effect—the water movement going around and around kept the planktonic animals up in the water column and not resting on the bottom of the tank. It was revolutionary!
That was over 45 years ago! Since that time many new jellyfish tank designs have emerged and each one has its benefits. There are true kreisels, like originally mentioned, a true circle inside of a square aquarium and there are pseudo kreisels. Pseudo kreisels include those plankton kreisels that are modifications of the original and include Stretch kreisels where the tank is longer than it is tall and these can be either Horizontal Stretch kreisels or Vertical Stretch kreisels, and there are Cylinder and Half Cylinder tanks, as well as, Modified Tumbler Boxes.
The important thing to know are the key features that make a jellyfish tank safe for jelly keeping. The flow needs to be consistent and even and the drain or overflow needs to be protected.
Because jellyfish move with the flow of water, wherever the water flows, so will the jellies. So, if the water flows into the tank, it must flow out by way of a drain. This drain must be protected or guarded otherwise the jellies will go down the drain. You need a tank that can properly create a nice even flow for the jellies to swim or bell, and a safe guarded drain so they don’t go down it. Two very simple, but important requirements for a jellyfish tank.
So, what is up with the Jellyfish Tumbler Tank? It isn’t round or cylindrical?
No, it isn’t, but it doesn’t have to be as long as all the bases are covered—even and consistent flow and a protected drain. It may look simple, but the inner workings of a Tumbler style jellyfish tank are just as intricate and defined as with a standard kreisel tank. The spray bars are well defined in two places. The drain is protected by a screen and a spray bar that gently moves the jellies away if they get near. The Tumbler tank creates a gentle turnover of the water column so the jellies can bell freely without being forced around and around like on a merry go round.